

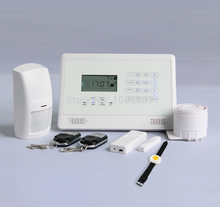
GSM alarm SMS Remote Controller S130,Relay Switch by Mobile Phone,Remote Turn ON OFF by NC NO sensors or SMS or Android ios App
| 45 days Money back Returns accepted if product not as described, buyer pays return shipping; or keep the product & agree refund with seller. | |
|
On-time Delivery Guarantees: On-time Delivery 60 days |
Most Popular from Category

SMS Command List
|
SMS COMMAND |
Functions & Actions |
Very Important! Please fill the Installation Schedule at Page 26 before programming it. |
|
AA |
To arm the SafeBox, in this mode, any detector triggered will alarm. |
|
|
BB |
To disarm the SafeBox, in this mode, detector triggered will not alarm. |
|
|
CC |
To switch ON the Siren output. |
|
|
DD |
To switch OFF the Siren output |
|
|
EE |
Inquiry the SafeBox Status and GSM Module IMEI Code. |
*The commands should plus Password, the format is Password+SMS Command. i.e.: if the password is 1234, then you can send 1234AA to arm, 1234BB to disarm, the AA~EE must be Caps Lock.
1. Brief introduction
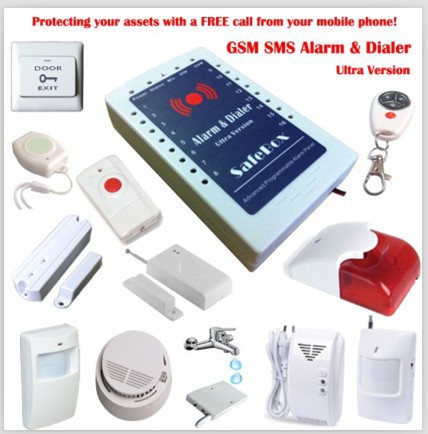
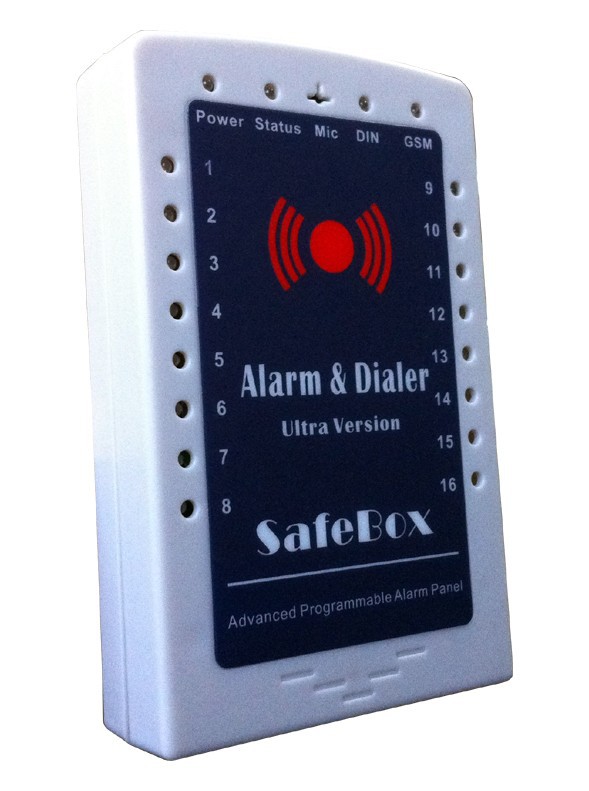
The GSM Alarm & Dialer SafeBox is an Ultra Version of GSM Alarm, includes multi-functions and ultra low cost and high reliability special for Residential areas, business area, commercial area, office, factory, industrial area and other Varity applications. It integrated high performance GSM Module and MCU inside, and with innovative and experienced functions and features to meet the required and potential demands in the worldwide markets.
The user can receive SMS Text and calling from the SafeBox once the alarm occurrence immediately. Also, the user can remotely armed or disarmed and switch on or off the siren by SMS Commands, or remotely switch the SafeBox to arm or disarm with free call from mobile phone, or remotely call in the SafeBox to listen in on-site, or send SMS Command to request the SafeBox call back.
Moreover, the SafeBox supports Android Apps and iOS, though the Android and iOS Apps, the user can quickly to Arm, Disarm, Inquiry Status and Switch ON or OFF Siren, armed or disarmed with free call, no need to program the SMS commands every time.
The SafeBox equips 1 wired inputs for IP Camera Alarm Output, other alarm panel output to transfer alarm message by SMS over GSM Network.
2.Safety Directions
Safe Startup
Do not use SafeBox when using GSM equipment is prohibited or might bring disturbance or danger.
Interference
All wireless equipment might interfere network signals of SafeBox and influence its performance.
Avoid Use at Gas Station
Do not use SafeBox at a gas station. Power off SafeBox when it near fuels or chemicals.
Power it off near Blasting Places
Please follow relevant restrictive regulations. Avoid using the device in blasting places.
Reasonable Use
Please install the product at suitable places as described in the product documentation. Avoid signal shielded by covering the mainframe.
Use Qualified Maintenance Service
Maintenance can be carried out only by qualified maintainer.
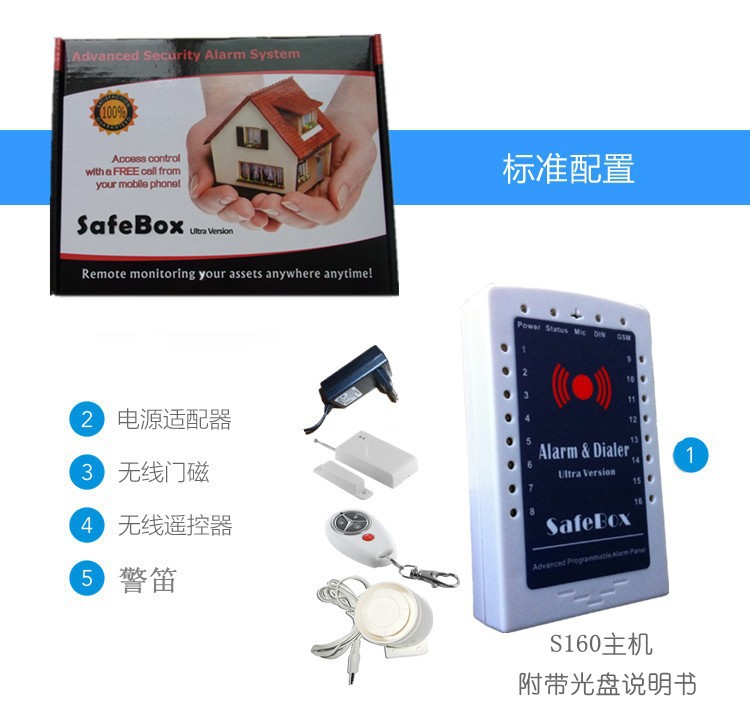
3. Standard Packing List
SafeBoxX1
AC/DC Adaptor X1
Remote Control X1
Wireless Door Contact X1
User Manual X1
*The Android Apps please contact the distributors , the iKeypad please download from Apple Store for iPhone.
Optional Accessories: (Wired Sensors or wireless detectors)
PIR Motion Sensor, Glass Break Sensor, Magnetic Window Sensor, Temperature Sensor, Infrared Beam Fence, Vibration sensor, Siren.
4. Mainly Features
ü Supports Away Armed, Partial Armed(At House or Stay) or Disarmed by Remote Control, Wireless Buttons, Wired Buttons, SMS Commands, Call in with free charge, Android Apps and iOS apps;
ü Supports Android Apps and iPhone iOS apps, quickly to Arm, Disarm, Inquiry Status, Switch ON or OFF Siren, Call in to arm/stay, Call in to listen in;
ü Supports 6 Authorized Numbers, each number can be setup as receive SMS or receive call or both of them, also, each number can be setup authorized to call in to listen or call in to arm or stay the system;
ü Supports listen on-site through internal sensitive microphone and call back according to SMS request;
ü Automatically send SMS Alert Alarm Message and dial to the authorized numbers when alarm occurrence;
ü Learning code, more safe and easy to add new wireless remote keys and wireless detectors;
ü Supports 16 Wireless Zones, can accept one learning code wireless detector in each zone, and accept unlimited PT2262/2272 fixed code wireless detectors in each zone;
ü Supports 1 wired zones(Dry Contact Type), the input can be Normal Close(NC), Normal Open(NO), special for IP Camera alarm output or other wired sensor connection;
ü Supports verity programmable zone attributes, includes Away(normal), At House or Stay, Entrance Zone, 24 Hours Sound Zone, 24 Hours Silent Zone, Local Zone, SOS Zone, Door Bell Zone;
ü The SMS Alarm Content of each zone is programmable by user through SMS Commands;
ü Supports 3 Remote Keys, each Remote Key includes one SOS Panic Button for emergency condition to ask for help;
ü Supports Armed delay to give enough time to leave the home, the delay time is programmable by user;
ü Supports Alarm Delay to give enough time to Disarm it when you come back home, the delay time is programmable by user;
ü Equips one siren output for sounding while alarm occurrence to warning;
ü The external AC power failure & recovery alert function supports 2 optional: Immediately Send SMS to user, after 30 minutes if not recovery then send SMS to user;
ü Standby internal large capacity rechargeable battery which can standby upto 8hours after AC Power failure, also can provide power to wired siren after AC power failure;
ü Secure – Using caller ID for identification, unknown callers are ignored;
ü Supports Password to increase the security of the whole system;
ü Based on the GSM communication network, no distance limitation.
5. Installation and Connection Diagram
Tips:
a. The backup battery was disconnected, please contact it firstly according to 5.6.
b. After switched on the SafeBox, will indicate by a long Di sound,all zones’ LED will turn on once, and the zones which registered wireless sensors, wireless remote control or wireless buttons will turn on once more.
In the backside of the SafeBox, please remove all of the 3 screws, and take the back cover off, then you can see the PCB. See below:
5.1 Inserting the SIMCard
Important: Make sure to switch off SafeBox before inserting or removing your SIM card.
1) Slide the SIM card holder in the direction of “â€OPEN†(etched on the SIM card holder), and then flip it open.
2) Insert the SIM card with its gold contacts facing down and its cut-off corner facing out the SIM card slot. See above photo.
3) Slide the SIM card completely into the slot. Make sure the SIM card goes through the 2 “â€guides†on the SIM card slot.
4) Close the SIM card holder and then slide it in the opposite direction of “â€OPEN†to lock it. See above photo.
5.2 Making the Outlets for wires
The SafeBox reserved 4 outlets for wires at backside outlets and bottom outlets. The user can choose the suitable one for different installation requirements. Please use a knife or other tool to remove the obstacle plastics. Usually, the siren and power supply wires were in one outlets, and the signal control wires in another outlet to avoid the interference.
Backside Wires Outlet Bottom Wires Outlet
5.3 Contacting the Wired Sensor or IP Camera or Other Alarm Panel to the SafeBox
The SafeBox equips one dry contact (Normal Close or Normal Open type) digital input port, the user can connect the IP Camera or CCTV DVR or wired detector or other alarm panel to this port. When the digital input triggered by IP Camera or CCTV DVR or wired detectors or other alarm panel, it will alarm.
1) Contacting the wired Detector to SafeBox
The wired detector has two connectors, please contact one of them to the DIN port, another contact to the GND port. And setup the Digital input be the correct NC or NO type by SMS Commands. (Tips: if you don’t know the NC or NO type of the Detector, please try to change the setting to NC or NO type by SMS Commands to after you finished connections.)
If you need to contact more than one wired to the SafeBox, please ensure all of the wired detectors are the same output type (Normal Close or Normal Open Types), any one of these detectors triggered, the SafeBox will alarm.
If the wired detectors are NC type, then the connection must be in series, see below:
if the wired detectors are NO type, then the connection must be in parallel, see above.
2) Contacting the IP Camera or CCTV DVR to SafeBox
The user can connect the IP Camera or CCTV DVR Alarm Output to the SafeBox’s digital input as a wired detector, once the IP camera detected intrusion or CCTV DVR alarming, the SafeBox will send SMS to the preset numbers and dial the preset number and make sounds by the siren. This is very useful for lots of application that need IP Camera and Alarm immediately by SMS or Dialing. The connection is below:
3) Contacting the other alarm panel output to SafeBox
The user can connect the other Alarm panel’s digital output to the SafeBox’s Digital Input as a wired detector, so the user can update its alarm panel as GSM SMS Alarm. The connection please reference the DVR or IP Camera.
5.4 Contacting the Wired Arm or Stay or Disarm Buttons or Access Control & RFID Card Reader
The SafeBox equips ports for Arm, Disarmed by wired buttons or RFID Card Reader for user convenience. The user can install a NO type button for armed it at the entrance, and through a separately button to disarm it in the place will not be discovered. Or in office and store and shop where many people with RFID card, then can connect the RFID Card Reader output signal to the disarmed port, so once somebody open the gate, will automatically disarmed it by RFID Card Reader, no need any other operations.
Tips: The Button or output signal from Access Control or RFID Card Reader must be NO type.
The user can setup the Arm port as Arm function or Stay function by the 1st PIN of the 8PIN Switch, when the 1st PIN at ON side, it is Stay function, if the 1st PIN at the OFF Side, then it is Arm function, default is at the OFF Side, see below:
The connections for wired buttons please see below:
The connections for Access Control & RFID Card Reader please see below:
5.5 Contacting the Siren, hooter
The user can connect one 9~12V rated siren, or hooter to the SafeBox’s siren output, once alarm occurrence, this output ports will start the siren or hooter to make sounds. The positive of the siren connect to the Siren+ port, and the negative of the siren contact to the Siren – port. Generally, the siren wire marked red color and black color, the red color is positive and the black color wire is negative. See below:
5.6 Contacting the Rechargeable Backup Battery
The SafeBox equips one rechargeable backup lithium battery that can power on the SafeBox for about 8hours while AC Power goes off. The SafeBox will automatically detect the voltage of the battery, once the voltage lower will charge it automatically. If you are not use the SafeBox for lone time, please remember to disconnect the backup battery. Please install the battery connector to the socket, please see below:
Notice: Must open the backside cover then you can contact the battery. Once the backup battery turn over, the SafeBox cannot work properly, please contact the external 12VDC to charge it firstly. If you want to replace the battery by a new one, please note the specification of the backup battery is: 3.7V lithium battery 900~ 1200mA. If long time not use the SafeBox, please disconnect the backup battery to save its lifetime.
5.7 Registering the wireless sensor, remote control, wireless buttons to the SafeBox
Tips: a. After registered the wireless sensor,remote control or wireless buttons, must restart the SafeBox;
b. After your registered a wireless sensor or remote control or button to the position, must switch back the DIP to OFF Side except the 1st position.
c. The package wireless detectors registered in the SafeBox already, no need to relearn it again.
The SafeBox is learning code, more safe and easy to add new wireless remote keys and wireless detectors, it supports 3 remote controls and 16 Wireless Zones, it can accept one learning code wireless detector in each zone, and accept unlimited PT2262/2272 fixed code wireless detectors in each zone. The SafeBox integrated verity programmable zone attributes, includes Away(normal), At House or Stay, Entrance Zone, 24 Hours Sound Zone, 24 Hours Silent Zone, Local Zone, SOS Zone, Door Bell Zone. The SMS Alarm Content of each zone is programmable by user through SMS Commands.
Please follow below step by step to learning the wireless detectors or remote controls or wireless buttons to the expected zones.
1) Writing Installation Schedule
Please write down your schedule in below table, it will make you clearly what sensor in which zone and with what attribute, e.g.: using a wireless door contact for entrance, using the photoelectric beams for wired zone in outdoor fence, and using a wireless smoke detector for fire alarm and so on. Please see the Affix table.
2) Read the Switch-Combination-Zone Number Corresponding Table
The SafeBox with fixed switch-combination positions for different wireless detectors and wireless remote controls, please see Switch Positions-Zone Number Corresponding Table Structure and Switch-Combination -Remote Control Corresponding Table.
|
Switch-combination-Zone Number Corresponding Table |
||||||
|
Zone Number |
Switch Position(4-8) |
|||||
|
SWTICH 4 |
SWTICH 5 |
SWTICH 6 |
SWTICH 7 |
SWTICH 8 |
Notice: The value in the table for each zone corresponding the position of the switch, 0 stands for OFF side, 1 stands for ON side. So the 01 zone should setup as the 02 zone should be setup as. The 15 zone should be setup as |
|
|
01 |
0 |
0 |
0 |
0 |
1 |
|
|
02 |
0 |
0 |
0 |
1 |
0 |
|
|
03 |
0 |
0 |
0 |
1 |
1 |
|
|
04 |
0 |
0 |
1 |
0 |
0 |
|
|
05 |
0 |
0 |
1 |
0 |
1 |
|
|
06 |
0 |
0 |
1 |
1 |
0 |
|
|
07 |
0 |
0 |
1 |
1 |
1 |
|
|
08 |
0 |
1 |
0 |
0 |
0 |
|
|
09 |
0 |
1 |
0 |
0 |
1 |
|
|
10 |
0 |
1 |
0 |
1 |
0 |
|
|
11 |
0 |
1 |
0 |
1 |
1 |
|
|
12 |
0 |
1 |
1 |
0 |
0 |
|
|
13 |
0 |
1 |
1 |
0 |
1 |
|
|
14 |
0 |
1 |
1 |
1 |
0 |
|
|
15 |
0 |
1 |
1 |
1 |
1 |
|
|
16 |
1 |
0 |
0 |
0 |
0 |
|
Switch-combination – Remote Control Corresponding Table
|
Switch-combination – Remote Control Corresponding Table |
||||
|
Serial Number |
Switch Position(2-3) |
|||
|
SWTICH 2 |
SWTICH 3 |
The value is same as above-mentioned. So 01 should be setup as: ,03 should be setup as: |
||
|
01 |
0 |
1 |
||
|
02 |
1 |
0 |
||
|
03 |
1 |
1 |
||
3) Enter Leaning Mode
Please press the Learn button, and switch on the SafeBox, after switch on the SafeBox, will alert Di once, then after enter learning mode, will alert Di—Di two sounds, total 3 Di sounds(about 5 Seconds), it being learning mode, then loose the button. The learning Button under Pressed status before switching on the SafeBox till heard total 3 “Di†sound .
The LED of each zone which registered wireless detector or remote control or button will turn on.
Notice:
1) The SafeBox cannot exit the learning mode automatically, must switch off the unit then switch on again to enter the normally mode. The Switch-Combinations for each zone must be active by at least one switch to learning mode by switch the buttons from OFF to ON, and after learned the correct detector into this position, please switch the button back to OFF, otherwise the zone will in learning mode all the time.
2) When learning one detector to the SafeBox, the other wireless detectors must be in OFF status, otherwise will confuse the learning operation.
4) Learning the Wireless Detector or Remote Control to SafeBox.
When the SafeBox in the learning mode, then switch the corresponding switch-combinations from OFF to ON one by one, and trigger the wireless detector(see Notice), the SafeBox will learn the code from the wireless detector automatically. When alert by long “Di—-†sounds, means the wireless detector was learned to the zone position, please switch the switches back to OFF. Meanwhile, please switch off the wireless detector, otherwise will alert by “Di Di†two sounds after you switch the switch back to OFF. If before switch the switch to OFF then alert by “Di Di†two sounds, then means the operation failure, please switch them back to OFF then retry again.
Switching the other switch-combinations from OFF to ON one by one to learn the wireless detectors to other zones..
Notice:
1. The default Password is 1234.
2. All the settings are through SMS commands, please edit the below SMS commands in your cell phone, then send to the SafeBox. (Tips: The SafeBox cannot support PIN Code Protected SIMCard. Please ensure you have disabled the PIN Code of the SIMCard, otherwise can not register GSM Network successful.)
3. You can program the GSM Alarm & Dialer SafeBox with SMS commands using your phone. It is safe to do so because in addition to the fact that other people may not know the number of the SIM inserted in it, we also use a Password that makes it impossible for anybody, who doesn’t know it, to access the system by chance.
4. Remember that commands must be CAPITAL LETTERS. It is PWD not pwd, CAP not Cap etc. Don’t add spaces or any other character.
5. The pwd in the commands is means the password, when you use it, please in stand of it by the digital number.
6. In some GSM operators, they use different SMS parameter, the units can’t return the SMS confirmation is normally. It is not product problem. Also, you can try to add the country code before the number, see the below settings:
7. Please write down the setting list in a paper for review in further, please see the affix table at the last page, and tear down from this instruction for review.
8. If the command is incorrect, the SafeBox will return: SMS Format Error, Please check Caps Lock in Command! Or other warning message. So please check the Command, or check the input is in ENGLISH INPUT METHOD and CAPS LOCK. If the password incorrect will not return any SMS.
9. When power on the SafeBox, will alert Di sound once, and all zones’ LED will turn on once, then the LED which registered wireless sensor already will turn on once more.
10. If more than 2 minutes the GSM Simcard still register the GSM Network failure, the buzzer will make “Di†once, and every 10 seconds detects the SIMCARD registering status and failure will alert by “Di†once till restart or switch off.
11. If the communication between the MCU and GSM Module failure, the buzzer will make “DiDi†twice to warning every 10 seconds till switch off or restart.
12. If detect the SafeBox hasn’t inserted SIMCard, the Buzzer will only make once di sound to alert. And will not detect the SIMCard again.
13. When alarm occurrence and in the delay alarm time, the buzzer will alert by “DiDi†sounds, once the delay timeout the buzzer will stop to sound.
14. Reset the SafeBox will alert by a 2seconds “Di†sound by the buzzer.
15. After you reset or learning remote control or wireless sensors, please remember to restart it, otherwise, can not work proplerly.
16. The SMS commands that you will certainly use in the GSM Alarm & Dialer SafeBox are the following:
About Shipment :
1. WORLDWIDE SHIPPING.(Except some countries and APO / FPO)
2. Orders processed timely after the payment verification.
3. We only ship to confirmed order addresses. Your order address MUST MATCH your Shipping address.
4. The images shown are not the actual item and are for your reference only.
5. SERVICE TRANSIT TIME is provided by the carrier and excludes weekends and holidays. Transit times may vary, particularly during the holiday season.
6. If you have not received your shipment within 30 days from payment, please contact us. We will track the shipment and get back to you as soon as possible with a reply. Our goal is customer satisfaction!
7. Due to stock status and time differences, we will choose to ship your item from our first available warehouse for fast delivery.
Return&Refund:
1. You have 7 days to contact us and 30 days to return it from the date it was received. If this item is in your possession more than 7 days, it is considered used and WE WILL NOT ISSUE YOU A REFUND OR REPLACEMENT. There are NO EXCEPTIONS! Shipping cost is bear by both seller and buyer in half.
2. All returned items MUST BE in the original packaging and you MUST PROVIDE us with the shipping tracking number, specific reason for the return, and your po .
3. We will refund YOUR FULL WINNING BID AMOUNT, upon receipt of the item in its original condition and packaging with all components and accessories included, AFTER BOTH Buyer and Seller cancel the transaction from aliexpress. OR, you may choose to have a replacement.
4. We will bear all the shipping cost if the product (s) is (are) not as advertised.
About Guarantee:
1. 12 months Manufacturer `s limited Warranty for defective items (excluding items damaged and / or misused after receipt). Accessories come with a 3-month warranty.
2. Defective items MUST BE reported and returned within the warranty period (and in the original packaging, if possible). You must tell us what the defect is and give us your order number. WE DO NOT REPAIR OR REPLACE ITEMS WITH AN EXPIRED WARRANTY .
You agree to all of the above-listed policies upon ordering on aliexpress!
About Feedback:
We maintain high standards of excellence and strive for 100% customer satisfaction! Feedback is very important We request that you contact us immediately BEFORE you give us neutral or negative feedback, so that we can satisfactorily address your concerns.
It is impossible to address issues if we do not know about them!
0 out of 5 (0 Ratings)
| Positive (0%) |
5 Stars (0)
|
|
4 Stars (0)
|
|
| Neutral (0%) |
3 Stars (0)
|
| Neutral (0%) |
2 Stars (0)
|
|
1 Star (0)
|
| Name | Rating | Feedback |
|---|
| Shipping Company | Shipping Cost | Estimated Delivery Time |
|---|---|---|
| 3 - 7 days | ||
| 3 - 7 days | ||
| 5 - 14 days | ||
| Post Air Mail | Free Shipping | 15 - 45 days |
| Return Policy | If the product you receive is not as described or low quality, the seller promises that you may return it before order completion (when you click "Confirm Order Received" or exceed confirmation timeframe) and receive a full refund. The return shipping fee will be paid by you. Or, you can choose to keep the product and agree the refund amount directly with the seller. N.B.: If the seller provides the "Longer Protection" service on this product, you may ask for refund up to 15 days after order completion. |
|---|---|
| Seller Service | On-time DeliveryIf you do not receive your purchase within 60 days, you can ask for a full refund before order completion (when you click "Confirm Order Received" or exceed confirmation timeframe). |
Most Popular from Category
Hot Sale 3 Colors Nut 2 Smart Tag Bluetooth Tracker Anti-lost Tracking For Child, Pet, Valuables Free Shipping
US $11.97 / piece
Anti lost alarm Theft Device Anti-lost/Self-portrait for bluetooth 4.0 Smartphone
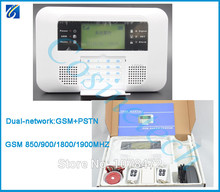
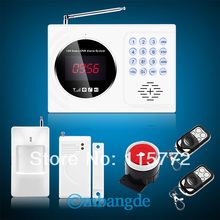
Voice prompt SMS control Mobile Call GSM 850/900/1800/1900MHz dual-network GSM/PSTN Home security GSM Alarm System
Free Shipping Touch Screen 2014 New Wireless GSM Mobile calling Emergency panic button alarm system for old people and children
New 2015 Black Electronic LED Light Fish Bite Sound Alarm Bell Clip On Fishing Rod

electronic alarm Mobile phone burglar alarm for Iphone4/s,anti-theft device acrylic material remote control security goods
online shopping, buying directly from manufacturers?
- Go to Alibaba.com and enter the wanted item into search field.
- Having made your choice, click "Contact supplier" button on the right
- On the next page enter your request and click "Send" button.
- Upon clicking you will be asked to get registered. Do it and wait for the reply.
 ▼
▼